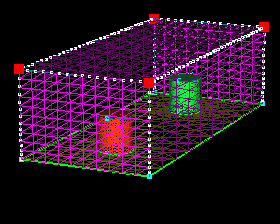
1. Read in pinfins.igs.gz
(for help on fileio see  )
with no glue, no trim (-ng -nt). The geometry is two pin fins on a flat
plate. The brown fin is intended to be connected to the plate and
will be used to illustrate )
with no glue, no trim (-ng -nt). The geometry is two pin fins on a flat
plate. The brown fin is intended to be connected to the plate and
will be used to illustrate  (so don't worry that the base of the fin doesn't lie in the plane of the
fin). The green fin is a closed cylinder set slightly above the plate
and will be used to illustrate techniques needed for gridding tight areas.
(so don't worry that the base of the fin doesn't lie in the plane of the
fin). The green fin is a closed cylinder set slightly above the plate
and will be used to illustrate techniques needed for gridding tight areas. |

|
2. Before any gridding can be done, the geometry has to be trimmed
to produce a topologically valid model. To start, a circular piece
where the brown pin connects to the plate needs to be trimmed out.
Select the curves shown and the plate and  .
Repeat for the other pin. .
Repeat for the other pin.
NOTE: The display resolution of the surface being projected on affects
the accuracy of the projection. You may want to increase the resolution
of the surface when projecting. See  for help.
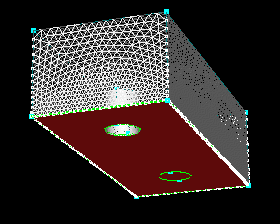
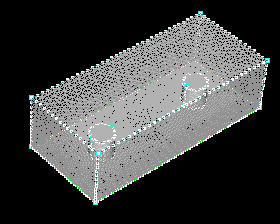
 |

|
3. Select the plate and hit  and
and  to work with the plane by itself.
 |

|
4. Select the surface and  but don't trim. There needs to be a hole at the left circle because the
brown fin is intended to connect to the plate, but the green fin sits above
the plate. It's not physically attached to the plate, and there will
be no hole in the yellow surface like with the other fin. Instead,
a surface trimmed into a circle will fill the second hole. This will
become clearer as you progress.
but don't trim. There needs to be a hole at the left circle because the
brown fin is intended to connect to the plate, but the green fin sits above
the plate. It's not physically attached to the plate, and there will
be no hole in the yellow surface like with the other fin. Instead,
a surface trimmed into a circle will fill the second hole. This will
become clearer as you progress. |

|
5. A duplicate of the the yellow surface is needed to create
the circular trimmed surface mentioned above. Select the surface,
click  ,
and set the angle of rotation to 360o as shown ,
and set the angle of rotation to 360o as shown  .
Now, click .
Now, click  to create the copy (you could also translate with a distance of 0).
There will be no visible change; the screen will look just like the image
above. Also, select one of the surfaces (doesn't matter which one,
they are identical) and
to create the copy (you could also translate with a distance of 0).
There will be no visible change; the screen will look just like the image
above. Also, select one of the surfaces (doesn't matter which one,
they are identical) and  .
The result will be one trimmed surface on top of a surface like the one
shown in step 4. Select the trimmed surface by hitting the key "p",
positioning the pointer over one of the points on one of the circles, and
clicking the far right mouse button. Turn the surface off. This will leave only the untrimmed surface and its parametric
curves. .
The result will be one trimmed surface on top of a surface like the one
shown in step 4. Select the trimmed surface by hitting the key "p",
positioning the pointer over one of the points on one of the circles, and
clicking the far right mouse button. Turn the surface off. This will leave only the untrimmed surface and its parametric
curves. |

|
6. Select the curves shown and
 leaving only the curves that would be below the green fin. This eliminates
the other valid trimming loops leaving only the loop under the green pin.
leaving only the curves that would be below the green fin. This eliminates
the other valid trimming loops leaving only the loop under the green pin. |

|
7. Select the surface and .
Hit  to view all the surfaces. Creating a round trimmed surface under
the green fin will help to line up the edge grid between the fin and the plate.
Also this allows more control of the surface grid point density below the
green pin. This will help to ensure a good quality volume grid.
to view all the surfaces. Creating a round trimmed surface under
the green fin will help to line up the edge grid between the fin and the plate.
Also this allows more control of the surface grid point density below the
green pin. This will help to ensure a good quality volume grid. |

|
8. Click  then
then  to see any problems with the topology. This will cause the curves
shown to be picked as problems. The four problem curves at the boundary
will be fixed when the outer boundary is added, so these are not really
problems. The other four curves selected are at the base of the brown
fin.
to see any problems with the topology. This will cause the curves
shown to be picked as problems. The four problem curves at the boundary
will be fixed when the outer boundary is added, so these are not really
problems. The other four curves selected are at the base of the brown
fin. |

|
9. Hit the "Esc" key or click
 to clear the pick list and zoom on the base of the
brown fin. Normally, a gap this large would not be acceptable and
clean-up would be required to make sure the fin connects to the plate within
tolerance, but to illustrate the effects of ,
increase the glue tolerance to 0.0065 and.
The boundary curve of the fin will disappear (gluing has made it topologically
the same as the parametric.), and now a
only picks the curves on the boundary of the plate.
to clear the pick list and zoom on the base of the
brown fin. Normally, a gap this large would not be acceptable and
clean-up would be required to make sure the fin connects to the plate within
tolerance, but to illustrate the effects of ,
increase the glue tolerance to 0.0065 and.
The boundary curve of the fin will disappear (gluing has made it topologically
the same as the parametric.), and now a
only picks the curves on the boundary of the plate. |

|
10. The only thing left to do is create the volume grid's outer
boundary and set point spacings, but to see the effect of ,
set all of the point spacings to 0.0125 and select one of the brown fin
surfaces and apply
(click the button by precedence in the menu and click
  ). ). |

|
11. Now,  .
As you can see, the points on the curve that are shared between the
two surfaces are forced to attach to the surface with .
For two surfaces where neither has precedence the points may lie on either
of the two surfaces. Precedence forces the points to lie in the plane
of the surface with precedence. In this case, the plate is intended
to be a plane of symmetry (i.e. only half of the geometry is being modeled),
so all points on the symmetry plane should lie in the yellow plane.
For this case, the plate should have precedence. .
As you can see, the points on the curve that are shared between the
two surfaces are forced to attach to the surface with .
For two surfaces where neither has precedence the points may lie on either
of the two surfaces. Precedence forces the points to lie in the plane
of the surface with precedence. In this case, the plate is intended
to be a plane of symmetry (i.e. only half of the geometry is being modeled),
so all points on the symmetry plane should lie in the yellow plane.
For this case, the plate should have precedence. |

|
| 12. Select the surface you selected in step 10 and remove precedence
by unselecting
in the
menu and clicking .
Now, select the plate (yellow surface) and apply
and .
As you can see, all of the points attached themselves in the plane of the
plate. For now, use the visible
graphics list toggles and turn the surface grid and edge grid off. |

|
13. The outer boundary for this case will be like a shoe box
covering the pin fins and plate. The five additional surfaces that
make up the outer boundary can be created several ways. One way is
to create the four corners and click  .
To do this select the corner shown (the lower red point, it is best to
use the POINT pick limit to ensure the vertex is picked and not an interior
point on one of the curves) and .
To do this select the corner shown (the lower red point, it is best to
use the POINT pick limit to ensure the vertex is picked and not an interior
point on one of the curves) and  .
This places the coordinates of the point selected in the X,Y,Z fields in
the points application. Enter 0.5 in the
Z field and click .
This places the coordinates of the point selected in the X,Y,Z fields in
the points application. Enter 0.5 in the
Z field and click  . . |

|
| 14. Clear the pick list and select the other corner
(the lower red point) and repeat step 13. |

|
| 15. Select the four points from the above two steps and. |

|
| 16. Repeat steps 13 and 14 to create the surface opposite the
one just created. |

|
17. The procedure above could be used to create the remainder
of the surfaces, but for illustrative purposes, the other surfaces will
be created differently. Select the curves shown and  .
This creates a surfaces with straight edges between the two selected curves.
Creating a ruled surface here would not have been appropriate if the plate
had not been flat. If the plate had any curvature, the curve where
the new surface and the plate meet would not match. .
This creates a surfaces with straight edges between the two selected curves.
Creating a ruled surface here would not have been appropriate if the plate
had not been flat. If the plate had any curvature, the curve where
the new surface and the plate meet would not match. |

|
| 18. Repeat step 17 for the surface opposite the one just created. |

|
19. To create the last surface, select the curves shown and  .
This creates a TFI surfaces from the selected curves. Typically,
a TFI surface is more "expensive" in terms of control points than the other
types (ruled, four point, ...) but is used here for illustration. .
This creates a TFI surfaces from the selected curves. Typically,
a TFI surface is more "expensive" in terms of control points than the other
types (ruled, four point, ...) but is used here for illustration. |

|
| 20. Select the 5 surfaces (shown in purple) created and create
a new group named OuterBoundary. Click
then .
A message should appear saying:
Integrity check passed!
0 Edges Picked.
The model is ready for gridding. |

|
| 21. The point spacing applied earlier should be all right for
the fins but may be too fine for the edges of the plate and outer boundary.
Select the corners of the plate and the points at the corners of the outer
boundary and apply a 0.025 spacing. |

|
22. This spacing is probably OK for the plate but is still too
fine for the outer boundary. Select the points at the corners of
the outer boundary and  with a ratio of 2. This doubles the point
spacing of the selected points.
with a ratio of 2. This doubles the point
spacing of the selected points. |
|
| 23. Hit
to generate the surface grid. Use the visible
graphics list toggles to turn the surface grid on and the surfaces
off. Click the quality toggle in the visible
graphics list toggles. This calculates the surface angles of
the triangles in the surface grid. For a good quality grid, maximum
angle should be less than 120o. You can see the grid is
more coarse at the top of the outer boundary where lots of points are not
needed. Also if you look at the surface grid on the plate the points
are more dense around the pin fins to better resolve the geometry.
In real cases, the points spacing will be dictated by the geometry being
modeled, but it is good practice to increase the point spacing in areas
where little activity is expected. This saves points and computation
time. Also, usually, the outer boundary is much farther from the
geometry than shown. The small package was necessary for illustrative
purposes. |

|
24. For this model, the fins will have viscous packing,
so select groups PinFinGrid, and PinFinPrecedence.
Click  ,
click the ,
click the  toggle, and .
Also, select the Plate group and click the
toggle, and .
Also, select the Plate group and click the  toggle on and .
This applies the normal growth boundary condition to the two fins and rebuild
to the plate. Select the outer boundary and apply
toggle on and .
This applies the normal growth boundary condition to the two fins and rebuild
to the plate. Select the outer boundary and apply  .
This will allow the volume generator to reconnect the triangles on the
outer boundary as necessary to maintain grid quality. .
This will allow the volume generator to reconnect the triangles on the
outer boundary as necessary to maintain grid quality.
FYI: Click on the group name Plate in the group
editor. This selects the surfaces in that group and displays
the applied boundary conditions in the information window. Hit "Esc"
to clear the pick list or click . |
|
| 25. Since the Rebuild boundary condition has been applied to
the Plate group, that surface will be rebuilt in the volume grid generator
to "match" the boundary layer grid (normal growth) built on the pin fin.
This means that the entire group grid for Plate will be destroyed and rebuilt
using the edge grid at it's boundaries. Basically, for the way the
surfaces are currently grouped, this will undo the work done to control
the spacing below the floating pin. To control this, select the circular
surface below the floating pin and create a new group named BelowFloatingFin
containing only this surface. Now when the Plate surface gets rebuilt,
the edge grid of the surface below the floating pin will be used also.
Hit
again to update the surface grid. |

|
26. In the Initial Spacing field of the
menu, enter 2e-6 (this is the packing normal to the solid surfaces
and the value depends on the geometry and run conditions). Leave all the
other options as the default. Click  .
This lunches the volume grid generator. Save
your changes (igs file) and exit. .
This lunches the volume grid generator. Save
your changes (igs file) and exit. |
|
27. Once the volume generator has finished read
the resulting grid into SolidMesh (sm -grid gridfilename).
Now, create a cutting plane to view the volume of the grid. Click  then click the
  .
Click the button beside the YZ to change the plane to a YZ cutting plane.
Enter 1.075 in the X field and .
Click the button beside the YZ to change the plane to a YZ cutting plane.
Enter 1.075 in the X field and  (the Add button in the viz panel not the group Add). Turn the
OuterBoundary group off and click
to turn the preview plane off. Zooming on the corner below the fin
not attached to the plate, you can see the viscous packing go underneath
the fin through the gap. Also, notice how the circular surface in
the plate helps to refine the surface grid under the fin. Later,
you might try skipping step 25 (leaving the circular surface in the Plate
group) to see what differences in the surface and volume grid result.
(Surfaces and cutting planes are shown Wire/Shad)
(the Add button in the viz panel not the group Add). Turn the
OuterBoundary group off and click
to turn the preview plane off. Zooming on the corner below the fin
not attached to the plate, you can see the viscous packing go underneath
the fin through the gap. Also, notice how the circular surface in
the plate helps to refine the surface grid under the fin. Later,
you might try skipping step 25 (leaving the circular surface in the Plate
group) to see what differences in the surface and volume grid result.
(Surfaces and cutting planes are shown Wire/Shad) |

|
| 28. Create another cutting plane
like above but this time with an X value of 0.1. Looking at the surface
grid of the Plate you can see the results of the Symmetry boundary condition.
The Plate group grid has been rebuilt to "match" the boundary layer.
Also, you can see the boundary layer grid on the pin fin reaches the plate
and stops. |

|
29. Click the toggle beside Volume Weather Map. Change
the max value from 160 to 150. Click  A message appears in the info window with the maximum surface and volume
angles and the number of elements drawn. Every element out side the
Min-Max range is displayed (in this case 0-150). This function can
be used to located problem areas in the volume grid.
A message appears in the info window with the maximum surface and volume
angles and the number of elements drawn. Every element out side the
Min-Max range is displayed (in this case 0-150). This function can
be used to located problem areas in the volume grid. |

|